Head of State
Fallout 3 Walkthrough and Guide
Fallout 3 Guide - Miscellaneous Quests
Head of State
|¯¯¯¯¯¯¯¯¯¯¯¯¯¯¯¯¯¯¯¯¯¯¯¯¯¯¯¯¯¯¯¯¯¯¯¯¯¯¯¯¯¯¯¯¯¯¯¯¯¯¯¯¯¯¯¯¯¯¯¯¯¯¯¯¯¯¯¯¯¯¯¯¯¯¯¯¯¯|
|HOW TO UNLOCK: Speak to Hannibal Hamlin in The Temple of the Union.           |
|                                                                              |
|ITEMS: [] Nuka-Cola Quantum, [] First Aid Box, [] Safe, [] First Aid Box,     |
|       [] Med-X, [] Jet x2, [] Nuka-Cola Quantum, [] Lincoln's Dairy,         |
|       [] Stimpak, [] Action Abe Action Figure, [] 10mm Rounds, [] Gun Cabinet|
|       [] Ammo Box x2, [] Grenade Box, [] First Aid Box, [] Safe, [] 10mm     |
|          Round x2, [] 10mm Rounds, [] Lincoln's Head, [] John Wilkes Booth   |
|          Wanted Poster, [] Civil War Draft Poster, [] Lincoln Memorial Poster|
|       [] Lincoln's Voice, [] Lincoln's Repeater, [] Chinese Army: Spec. Ops. |
|          Training Manual, [] Antique Lincoln Coin Collection. [] Ammo Box.   |
|                                                                              |
|QUEST REWARD: One of the following:                                           |
| (300 EXP)    1. Help the Abolitionists: [] Dart Gun Schematics               |
|              2. Help the Slavers: [] 200 Caps.                               |
|                                                                              |
|ENEMIES: o Slaver    o Feral Ghoul    o Feral Ghoul Roamer    o Glowing One   |
|                                                                              |
 ¯¯¯¯¯¯¯¯¯¯¯¯¯¯¯¯¯¯¯¯¯¯¯¯¯¯¯¯¯¯¯¯¯¯¯¯¯¯¯¯¯¯¯¯¯¯¯¯¯¯¯¯¯¯¯¯¯¯¯¯¯¯¯¯¯¯¯¯¯¯¯¯¯¯¯¯¯¯
You can find The Temple of the Union northwest of Canterbury Commons, if that rings any bells. It's basically in the northeastern section of the wasteland but not all the way up north. It's more around the middle.
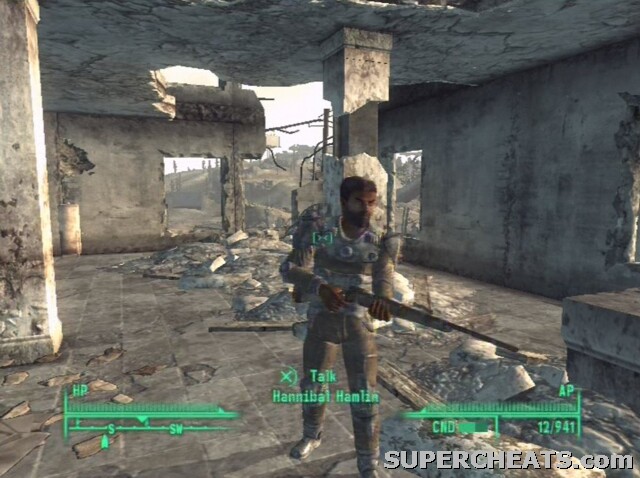 Talk to Hannibal Hamlin for the quest’s objective. |
When you attempt to enter, stay polite to be allowed inside. Find Hannibal Hamlin on the first floor to initiate the quest. You have two main options to go from here. Either you stay on the side of Hannibal, or you team up with the Slavers that you'll soon meet. This guide focuses on staying with Hannibal, simply because he offers the better reward of the two.
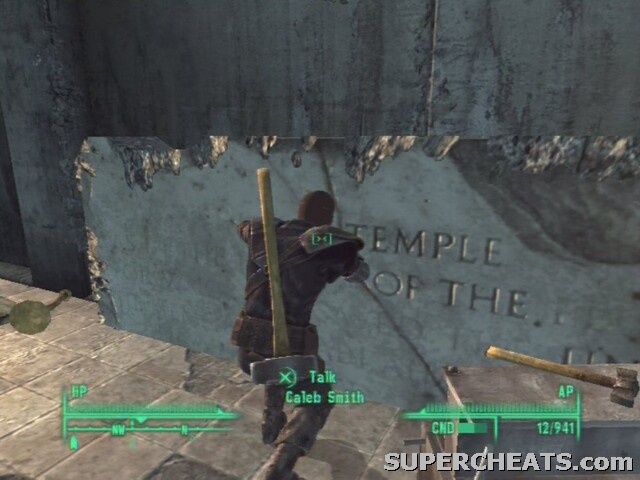 Next, talk to Caleb Smith downstairs and make your way to the Mall after you’ve searched and looted the place. |
Head downstairs and look around for Caleb Smith. Talk to him, then set foot for your next destination. Fast-travel to The Mall or a destination nearby, such as the Washington Monument, then head all the way west to discover the Lincoln Memorial. One of the slaver guards, Silas, will let you know that the memorial is off limits. Be polite and follow him to the back entrance, or simply start killing all the slavers right away.
Instead, stay on your guard and have a chat with the Slaver leader Leroy first. Don't tell him anything about the slaves you met, stay friendly, and he'll make you an offer: If you find any artifacts you can bring them to him and he'll make it worth your while. Search his room for a [NUKA-COLA QUANTUM] bottle. Head back outside and enter the Memorial - Yes, that means killing slavers alright.
Waste any slaver around and inside the memorial to complete one of your objectives. Your second objective involves getting a picture of the memorial. What you need to do is to head inside the Museum of History, go inside the Main Hall and take a left (west).
Museum of History: Lower Halls:
This video will quickly instruct you to the Lincoln Memorial Poster. The hissing sound in my neck are the various Ghouls that roam the place – their breath keeps my back warm.
Wipe out any Ghouls in sight and head for the small room to the east before anything else. Snatch the items from the desk, the [FIRST AID BOX] and the averagely locked [SAFE], then go back to the hall.
Move into the cafetaria on the south and make your way into the ladies restroom on your right (west). Search the former Wastelander for items here. You can find a [FIRST AID BOX] in the eastern room behind the counter. Continue your ransacking by moving through the nearby hall, and make your way to the SE. Loot the Wastelander and look on the table for a [MED-X] and [JET x2]. Don't forget to grab the [NUKA-COLA QUANTUM] from under the table.
Head back and go upstairs. You'll find a secured room to your right - a Mark V Turret has gone frenzy - but you can leave the room alone altogether or use the terminal to shut the turret down. Waste any Ghouls in the next room and check your right for [LINCOLN'S DAIRY], one of the artifacts you're looking for. Clear the area of Ghouls and go through the door at the end of the room to reach the Museum of History Offices. Boring? I don't think so!
Museum of History Offices:
Make your way upstairs and spot the many red dots on your compass. A number of Ghouls have hid themselves in the next hallway on your left. Carefully tread into the first room on your right and open up the Eat'o'tronic to find a possibly much needed [STIMPAK]. The door on the opposite has a Very Hard lock.
Head into the next room on your left, which is filled with ruined books and cases. Move into the adjacent room and look for the [ACTION ABE ACTION FIGURE] on the desk. Also find that the Very Hard locked from just now only leads to this room. Find [10MM ROUNDS] on the floor, check the [GUN CABINET], [AMMO BOXES x2], [GRENADE BOX] and [FIRST AID BOX] for supplies and unlock the Average [SAFE]. Use the terminal (Average Secured) to shut down any Turrets, then exit the room.
The desk near the cell door has [2x 10MM ROUNDS] on top of it. You can go through the western rooms, deal with more Ghouls, just to find a similar cell door and desk. Grab the [10MM ROUNDS] lying behind the desk, then go through either one of the cell doors, because the rest of the floor holds surprisingly little - nothing but [LINCOLN'S HEAD] in the caved-in room all the way north.
When you enter the archives, check the western bookcase for the [JOHL WILKES BOOTH WANTED POSTER]. Now move to the SE corner of the room and check the case to your right thoroughly to find the [CIVIL WAR DRAFT POSTER] on the top shelf.
Head upstairs and glance at the wall. Hanging behind the desk is nothing other than the [LINCOLN MEMORIAL POSTER]. You can now return to Hannibal, but it's better to explore some more. Waste any Ghouls that you may have brought to your attention, then search the nearby desk for the [LINCOLN'S VOICE] artifact.
The walkways to your south yield nothing but ruined books, so head into the ruined room to your north instead. Search any cabinets and desks for caps or ammo and more importantly, grab medical supplies from the [FIRST AID BOX] on the wall. Explore the NW corner of the room and open up the display case to treasure another artifact: [LINCOLN'S REPEATER]. While you're here, don't leave the [CHINESE ARMY: SPEC. OPS. TRAINING MANUAL] on the desk.
Head through the hall and start exploring the eastern rooms. In the SE room you can find the [ANTIQUE LINCOLN COIN COLLECTION] artifact in a bookcase. You can find an [AMMO BOX] in the room all the way northwest of the second floor, but beware of the gaps in the floor. The western rooms hold nothing of interest which means you can now head back to Hannibal.
Back at the Temple of the Union, hand over the memorial poster to Caleb, then find Hannibal on the second floor. He'll head over to Lincoln's Memorial right away when he hears about Caleb being ready. Fast travel to Mall Northwest and wait 6 hours or so - Hannibal & co. will show up. Talk to him and sell him any of the artifacts you've found; Be sure to apply Speech Challenges all the time and try to increase your Caps. The quest will be over; You'll receive the [DART GUN SCHEMATICS] for a job well done.
Okay, I told Hannibal and then I fast traveled over there but it said I as no longer well rested, so I fast traveled to Megaton, slept and traveled back. (this was before I read this guide and known it would take 6 hours for them to come). Are they still coming?
ARGH i told the group of people to wait, as i went ahead and killed the slavers, so no one in the group died, and after i killed them, i went back to hannibal and i dont have any option to tell him its clear, and everyone is saying "when he gives the word, we'll attack them!" ... please for god's sake, help meeeeee D:
You can also find a D.C guide to Medicine in the eastern room behind the counter. It's on the left hand side as you go through the door.
i broke both locks on cell doors leading to lincoln poster where is the key